Welcome to my first post here at #viidev! That's right, not #wiidev, #viidev. Here I (you many know me as coolbho3000 or tmusher or similar) will keep a mostly personal blog, with a primary focus on miscellaneous and interesting hacks I may discover or find. Now, on to the first one!
The title of this post is misleading. There is no such thing as a secure WEP network nowadays. There's always going to be a simple way to crack into this WEP and gain complete control of a victim's wireless connection.
Oftentimes, however, instead of exploiting encrypted networks as access points, hackers will break into susceptible wireless hotspots and harvest information from the clients that are connected to it. This could include personal information such as passwords and credit card numbers. The method described in this aims to prevent this kind of data theft on your network while still allowing full access to WiFi for the Nintendo DS (and other WEP-only wireless devices). At the same time, it allows you to keep a secure home network.
There are three ways of creating a secure network for the DS:
Use Buffalo's AOSS system. AOSS has gone uncracked and is fully supported by the DS. This is probably one of the easiest methods, but a major problem lies in the fact that you need a Buffalo branded router, which is hard to come by these days. Another downside to AOSS is that dswifi based homebrew applications will not work.
- Use the Nintendo WiFi USB Connector, which has also avoided cracking for ages. Unfortunately, this dongle was manufactured by Buffalo but is currently on hold, just like their routers. Also, this will not work with homebrew applications (or non-Nintendo devices), will only work in Windows, and is a system resource hog. It's possible to hack another RT2750 based USB dongle and make it work under the Nintendo drivers, however.
- Use a wireless router with multiple wireless interfaces and client isolation enabled for the less secure interface(s). This allows one to possess a secure wireless network (WPA/WPA2) while leaving a WEP connection for the DS at the same time.
Client isolation allows one to lock out each wireless client and prevent them from sharing each others' resources. This is a great to prevent people from hacking into a network, but such a feature also prevents the possibility of having a legitimate wireless network as well.
The solution to this problem is to create two virtual wireless interfaces, and only implementing client isolation on one of them. This will create a WEP network for the DS, and a secure network for everything else. Since the WEP network will have client isolation enabled, there is no possibility of anyone hacking into your network through the WEP vulnurability.
Step 1: Get custom firmware for your wireless router. This method will only work with routers that support this firmware (such as the Linksys WRT54GL). For this tutorial, we will be using the latest developmental version of DD-WRT (at this time, v24 RC7), but some other solutions like OpenWRT may work too. Be sure to follow the flashing instructions exactly for your router model and version. For some routers, it's as easy as visiting the device's IP and uploading a file, for others, the process gets more complex.
You could also use an official firmware that supports these features, but routers that officially have support for client isolation and virtual interfaces are generally very expensive.
Step 2: Set up a secure wireless network with WPA or WPA2. Setup under DD-WRT should be relatively straightforward. Everything you need should be located under the Wireless tab at the top, and the basic settings and wireless security under that. Remember that the Apply Settings needs to be pressed before anything will take effect.
Now connect everything (except for the Nintendo DS and other legacy WEP systems, of course) to your new network and test it.
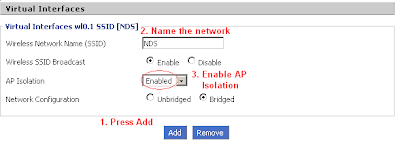
Step 3: Add a wireless virtual interface. To do this, choose the basic settings section under the Wireless tab. Click the Add button under the Virtual Interfaces header.
After adding a virtual interface, name it (don't give it the same SSID as your main network, however!) and enable the AP isolation option in the drop down menu at the bottom.
 Step 4: Implement WEP on the new virtual interface. This is done under the wireless security section. Because AP Isolation is enabled, you can be rest assured that hackers will not be able to break into your computer's files!
Now test the new connection in your DS. If everything was done correctly, the connection tests should be successful. Furthermore, you'll see that your other systems can connect to the WPA network just fine, even while the DS is connected using WEP. The DS connection search should look similar to the picture at the right. You should see one connection with a grey lock, and one with a red or blue lock.

Granted, this method will not prevent hackers from accessing your internet connection. However, it gives protection against malicious access of your files. Client isolation ensures that nothing connected to the WEP network can touch anything else connected to the router. At the same time, the network is still fully compatible with the DS and other WEP-only devices.
Whew, that was a long one. I hope this first post was useful to some of you! I promise to make the next one shorter and easier to read. See you next time.
